Step-by-step guide 2026
Client Onboarding Process for Small Business: A Step-by-Step Guide
A good onboarding process makes the next step obvious to both the client and your team. Here is a seven-stage process, a worked example, and a checklist you can use.

A client says yes. That is the good news. Then the details start to scatter. The signed proposal is in one inbox, the questionnaire answers arrive by email, a logo shows up in a text message, and the kickoff time lives on someone’s calendar. Everyone is busy, and nobody is quite sure what happens next.
Onboarding is the bridge between winning the client and doing the work. When it is loose, the project starts late and the first weeks are spent asking for things you should already have. This guide lays out a simple seven-stage process built around one idea: after every stage, both the client and your team should know the next step.
What is client onboarding?
Client onboarding is everything that happens between agreeing to work together and being ready to start the work. It covers the welcome, the information you need, the internal setup, and the first meeting. It ends when the team has what it needs and the client knows what to expect.
It helps to separate it from the work on either side:
- Sales ends with a decision. Onboarding starts once the agreement is in place.
- Project delivery produces the deliverables. Onboarding makes sure delivery can begin without guessing.
- Customer support answers questions after the fact. Onboarding answers the ones you can predict before they are asked.
The terms client onboarding and customer onboarding are used almost interchangeably. “Client” usually implies a service relationship with a defined engagement, which is the focus here.
Why client onboarding matters for a small business
In a small business, onboarding problems are rarely dramatic. They show up as small, repeated costs. A missing login delays the first task. Two people ask the client the same question. A decision-maker turns out to be someone you have not met. Each one is minor, and together they set the tone for the engagement.
A clear process protects five things: expectations, because the client knows the timeline and what you need from them; information, because it is collected once and kept in one place; ownership, because one person is responsible for each step; readiness, because work starts when it can succeed; and client confidence, because an organized start signals an organized business.
A step-by-step client onboarding process
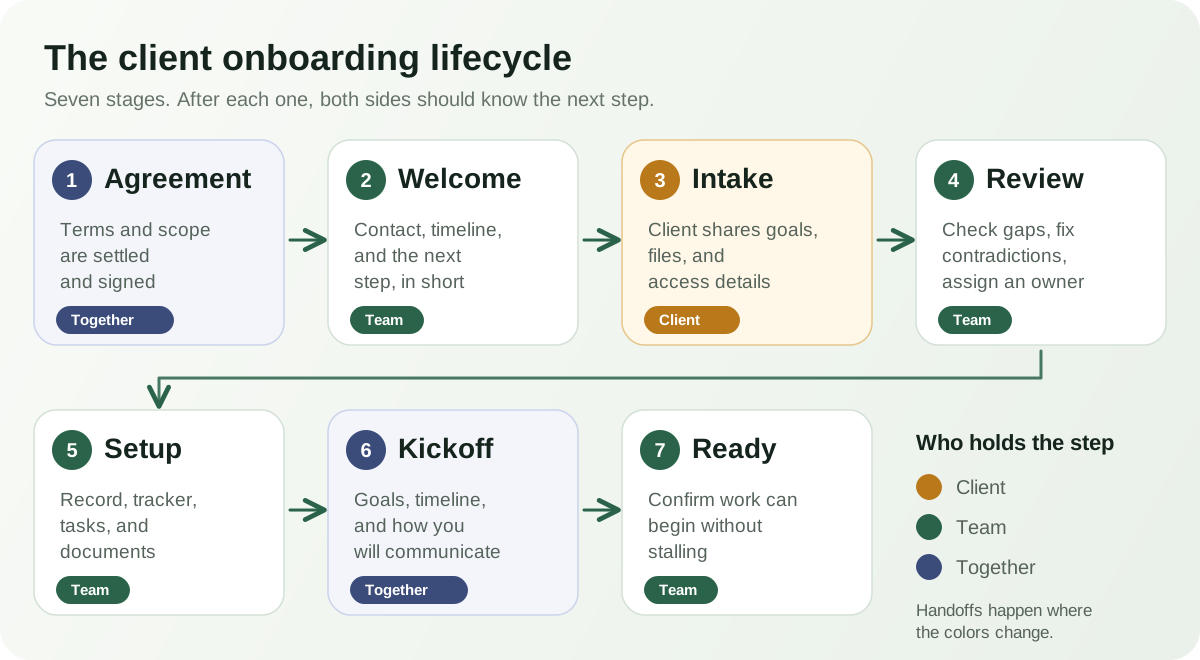
The stages below follow the client’s path from yes to first delivery. Some stages belong to the client, some to your team, and some are shared. Most onboarding trouble happens where the work changes hands, so the diagram marks who holds each step.
1. Confirm the agreement and scope
Start onboarding once the terms are settled, not while they are still moving. Guides such as Ignition’s client onboarding guide make the same point: do not begin work until the agreement is signed. Agree on what is included, what is not, the timeline, and the fees.
Writing this down protects both sides. A business proposal covers the offer, and a scope of work defines deliverables and boundaries. The scope is what everything later refers back to.
2. Send the welcome information
Send a short welcome soon after the agreement is signed. It should answer five questions: who is my main contact, how will we communicate, what happens next, roughly when, and what do you need from me? Keep it short. A client who receives a long packet on day one will skim it.
A reusable client welcome guide means you write this once and adjust it for each client.
3. Collect client information
Ask for the information you need, in the order you need it, before the kickoff. A form works better than a thread of emails because every answer lands in the same place. A client intake form is a good starting point.
Typical categories are contact details, project goals, the people who will make decisions, existing files and assets, deadlines, preferences, and any access you will need. Ask only what you will use. Every extra question slows the client down, and sensitive details such as passwords or financial information are better requested through a secure channel when you actually need them.
4. Review the intake internally
This is the stage most processes skip. A submitted form does not mean the project is ready. Someone on your team should read it before anything else moves.
- Is the information complete, or are files and access still missing?
- Do any answers contradict the scope, the timeline, or each other?
- Who owns this client from here?
- Is this a standard engagement, or an exception that needs a conversation first?
The review is where a person applies judgment. If something is unclear, contact the client now, while the request is small. It is far cheaper than discovering it in week three.
5. Set up the project
Once the intake is reviewed, turn it into working structure. That usually means a client record, a short project overview, a tracker or plan with milestones, tasks with owners and dates, and a place for the documents. A project overview and a project tracker cover the basics for many small engagements. Our guide to the project management workflow follows what happens once the project is running.
6. Run the kickoff
A kickoff is not a meeting for its own sake. It has a few jobs: confirm the goals and what success looks like, walk through the timeline, agree who decides and how often you will communicate, and clear any open questions. If the intake was reviewed first, the call can focus on those points rather than on collecting basics.
Send an agenda beforehand and a short recap afterward. A kickoff agenda keeps the conversation on those jobs.
7. Confirm delivery readiness
Before starting, confirm that work can begin without stalling. A short readiness check is enough:
- The agreement and scope are final.
- The required information, files, and access are in hand.
- Every task has an owner and a date.
- The client knows the first milestone and how updates will arrive.
- The team has read the summary of what was agreed.
If one of these is not true, name it and set a date to resolve it. Onboarding does not stop at the kickoff either. The communication rhythm you agreed on carries into delivery, so keep to it.
A client onboarding example
This is an illustrative scenario, not a real client. Imagine a four-person design studio that has just signed a website refresh for a local landscaping company.
- Day 0: The client signs the proposal and scope of work. The studio’s owner confirms who will lead the project.
- Day 1: The studio sends a short welcome with the lead’s name, the expected timeline, and a link to the intake form.
- Day 3: The form comes back. It has no brand files and lists two different people as the decision-maker.
- Day 3, review: The project lead spots both gaps, calls the client, and confirms one decision-maker. The files are promised by Friday.
- Day 5: The lead creates the client record and project tracker, adds tasks with owners, and drafts a kickoff agenda.
- Day 7: The kickoff covers goals, milestones, and how updates will be shared. The lead sends a recap the same afternoon.
- Day 8: A readiness check confirms files arrived and every task is owned. First-draft work begins.
Nothing here is sophisticated. The value comes from the review on day three, which caught two problems before they cost time.
Common client onboarding mistakes
- Asking for everything at once, so the client stalls on a long questionnaire.
- No clear owner, so each step waits for someone else.
- Duplicated information across email, a form, and a document, with no single source.
- An unclear next step after each message.
- Starting work before required information exists.
- Treating every client identically when their needs differ.
- Automating exceptions that need a person to look at them.
- Never stating how and how often you will communicate.
What should be automated in client onboarding?
Onboarding is a good candidate for automation because it repeats. Our guide to small business workflow automation describes a seven-part model (trigger, information, owner, decision, action, record, exception) that fits this process well.
Routine movement is worth automating: sending the welcome message, creating the checklist of tasks, reminding someone about a missing file, and keeping the client record current. The review in stage four is different. It needs judgment, and so does any exception, such as an unusual request or contradictory answers. Let software carry the routine steps and keep a person on the decisions.
A client onboarding checklist
Adjust this to fit your services. It is a starting point, not a universal standard. Once your version settles, write it up as a short procedure so a new team member can follow it; our guide to writing an SOP covers how.
- Agreement signed and scope confirmed.
- Owner assigned and named to the client.
- Welcome message sent with next steps and timeline.
- Intake form sent, and answers received.
- Intake reviewed for gaps and contradictions.
- Missing files and access requested, with a date.
- Client record created and project set up.
- Tasks created with owners and due dates.
- Kickoff scheduled, agenda sent.
- Kickoff held and recap sent.
- Readiness check complete and first milestone confirmed.
How ZuffSuite approaches client onboarding
ZuffSuite offers the pieces above as separate templates, and the Client Onboarding Business Kit assembles several of them into one workspace. The kit creates a client record in a Smart Table, a Client Welcome Guide, a Scope of Work, a Project Plan, a Kickoff Agenda, and a set of starter onboarding tasks. Handoff Notes and a Client Offboarding Checklist are available as optional extras for the end of an engagement.
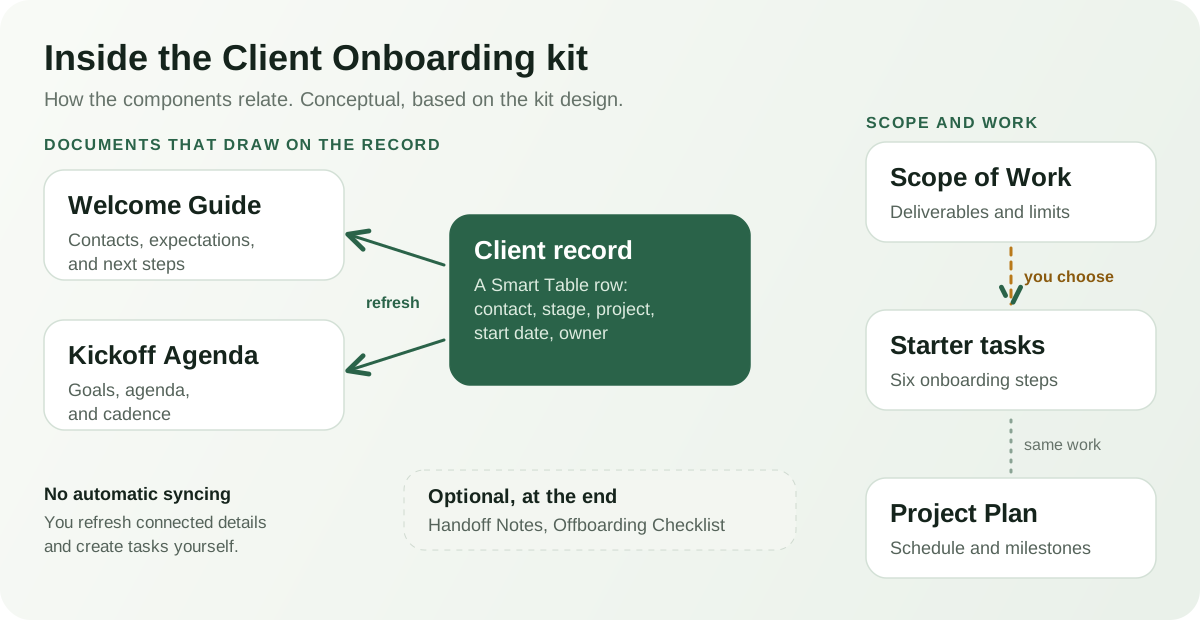
A few details matter if you plan to rely on it. Client details in the Welcome Guide and Kickoff Agenda come from the client record, and you refresh them when the record changes. Editing ordinary text in a document does not change the record, and completing a task does not update a document. The kit does not currently create the intake form or fill the client record from a submission. Use the client intake form template alongside it, review the answers, and add what matters to the record.
That is deliberate rather than a gap: the review in stage four is a human step. The kit’s job is to give the rest of the process a shared, organized home. If your onboarding needs deep integrations with other systems, a dedicated tool may still be a better fit. For a wider look at connected tools, see our guide to choosing an AI office suite for a small business.
Frequently asked questions
How long should client onboarding take?
There is no universal number. For a straightforward service engagement, the first week or two after signing is a reasonable target. Larger engagements take longer. Set a target date, share it in the welcome message, and adjust it once you know what the client needs to provide.
What information should a client intake form collect?
Collect what you will use in the first weeks: contact details, project goals, decision-makers, files and assets, deadlines, preferences, and access needs. Leave out anything you will not act on, and request sensitive information only when it is needed.
Who should own client onboarding?
One named person per client. In a small business that is often the project lead or the owner. Others can handle steps, but a single owner keeps the process moving and gives the client one contact.
Should client onboarding be automated?
Partly. Automate the repeatable steps such as reminders, task creation, and status updates. Keep the intake review and exceptions with a person.
What is the difference between client onboarding and customer onboarding?
The steps overlap. Client onboarding typically describes a service engagement with a scope and a project team. Customer onboarding often describes helping someone start using a product. The principles of a clear next step and a single owner apply to both.
What should happen before the kickoff meeting?
The agreement is signed, the intake is returned and reviewed, an owner is assigned, and an agenda has been sent. Then the meeting can be about goals and expectations instead of basic details.